Designing and Deploying Enigma 7.0

In this article, I will try to explain how we deployed the backend services for Enigma 7.0, a a cryptic hunt held annually by IEEE-VIT. Participants compete for the top rank on the leaderboard by solving cryptic puzzles within a span of 48 hours.
Functional Requirements:⌗
- Users need to be able to signup/login.
- Once the game starts, users should be allowed to answer questions.
- Upon a correct answer, the user should get some points based on how long it took them to answer it.
- Users should be able to use hints at the expense of some points.
- Users get 10 XP every hour from the time of their first attempt.
- Users can use powerups at the expense of some XP:
- A close enough answer is treated as the correct answer.
- Get a hint (at the expense of XP, not points).
- Skip a question.
- Users can view the leaderboard and their rank, points, etc.
Tech Stack and Technologies⌗
- Django (with DRF) for writing the APIs.
- PostgreSQL as our main database.
- In order to generate periodic XP for users we needed some kind of a cronjob. Instead of using the crontab functionality provided in Linux, we decided to explore and use Celery as a task queue and Redis as a message queue.
- We opted to do not go the managed services route and host everything (except Postgres) on our own. Docker (along with docker-compose) seemed like a no-brainer for this and we chose HAProxy for load balancing.
- We used the base GCP CloudSQL instance for our Postgres instance and a GCP Compute Engine instance with a 2vCPU and 8 gigs of RAM.
Schema Design⌗

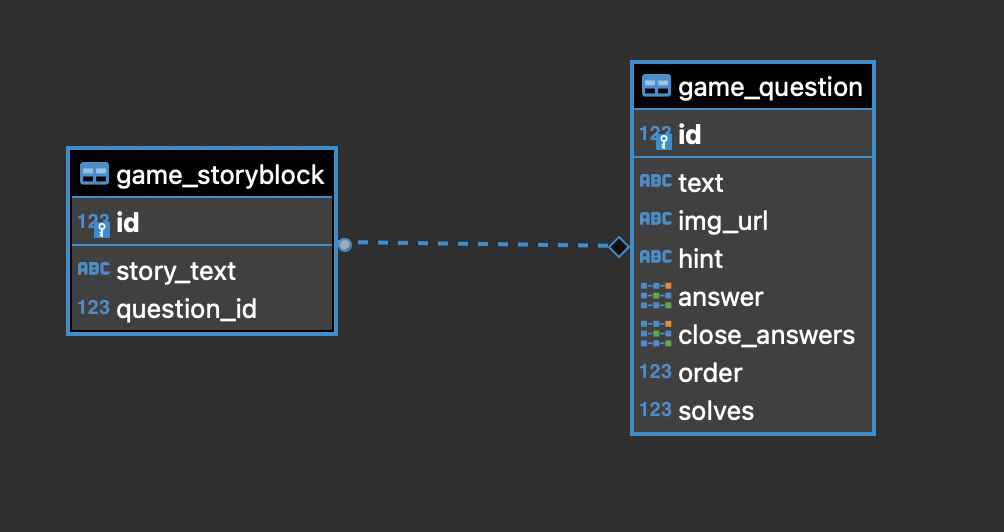
The Question tables stores the questions and information about the question itself. To make the game feel more immersive, we decided to add a story like experience to it. To enable this we have a Story table which stores “story blocks”, where each block is linked to a question via a foreign key.

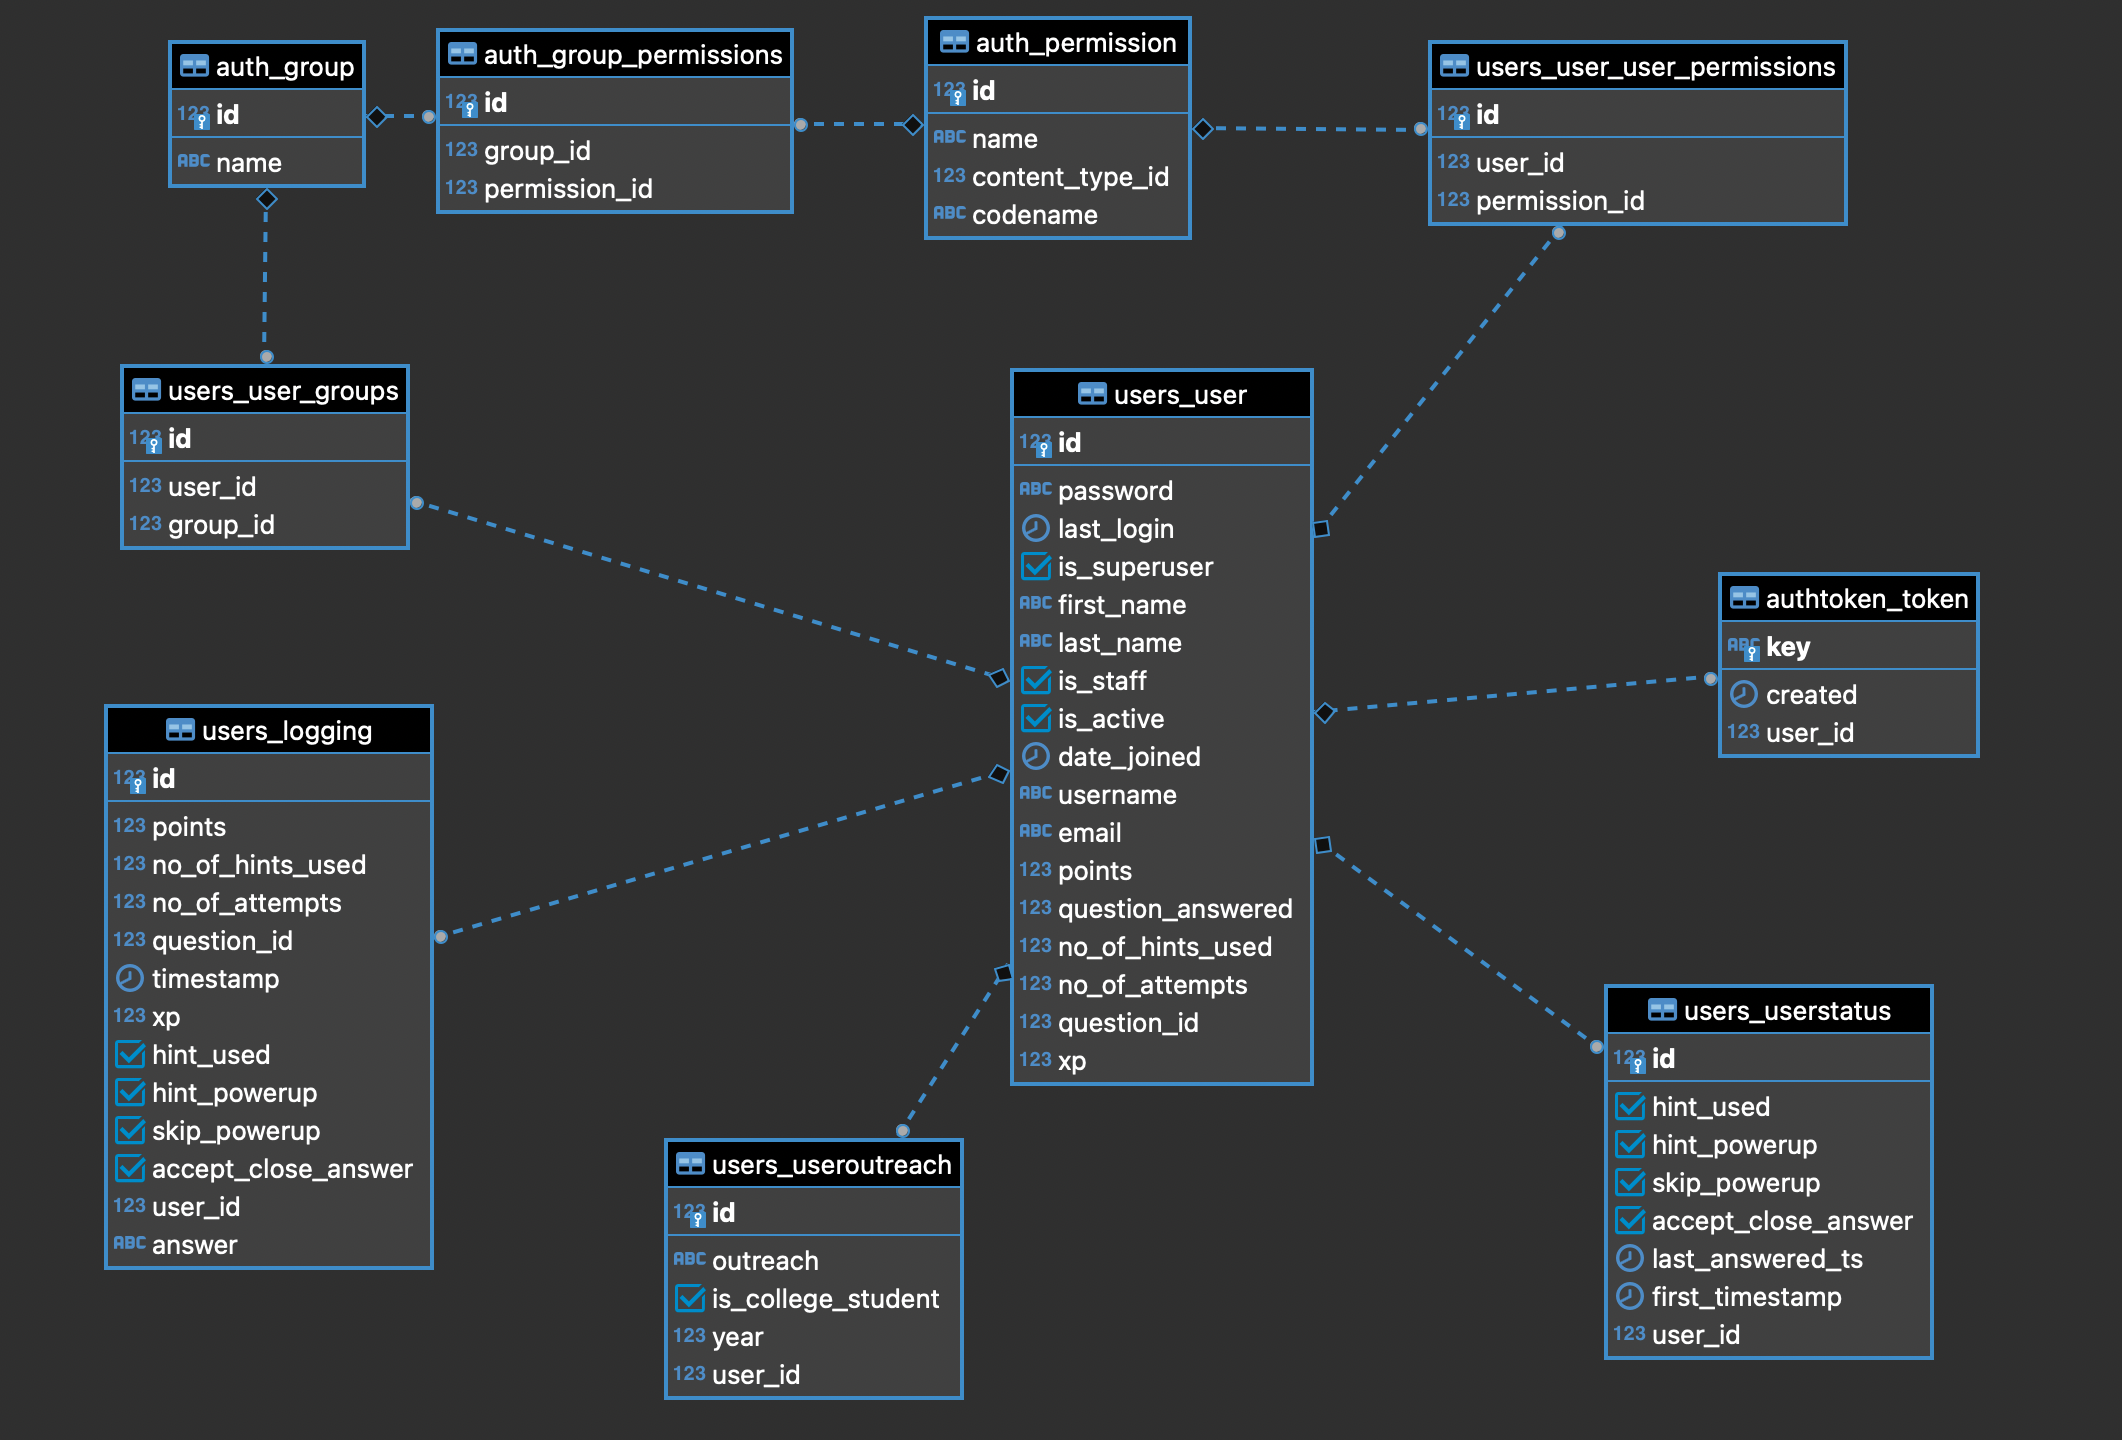
I have only included a few relevant tables here, to paint a clearer picture. The User table is quite self explanatory, it contains details of the user like name, email, points, etc. The UserStatus table tracks the user’s current state, such as whether they have taken a hint, or used a powerup, so that we can let users resume playing at the same state. Logging is a table to log user actions like using a powerup, attempting an answer, etc. This is used to analyze how players are playing and to prevent malicious acts like cheating, etc.
We don’t store the rank of users in the table. Instead of calculating the rank of all users, everytime someone gains some points, we make sure to track the timestamp of user attempts along with the points and accordingly calculate the rank of all users on the fly.
Dockerizing⌗
We write a Dockerfile for our codebase like so:
FROM python:3.6

ENV PYTHONUNBUFFERED 1
ENV PYTHONDONTWRITEBYTECODE 1

COPY ./requirements.txt /code/requirements.txt
RUN pip install -r /code/requirements.txt

COPY . /code/
WORKDIR /code/

EXPOSE 80
Notice, how we don’t define a startup command here. That’s because we will use the same container to start the Django server and the Celery workers.
Deploying⌗
Now, we write a docker-compose.yml, to deploy everything (almost xD):
version: '3.7'

services:
    web:
        build: .
        command: bash -c "cd /code && python manage.py migrate --noinput && gunicorn enigma7_backend.wsgi:application --threads 2 --bind 0.0.0.0:80"
        volumes:
            - .:/code
        depends_on:
            - cloud_sql_proxy
            - redis

    redis:
        image: "redis:alpine"
        ports:
            - 6379:6379

    celery:
        build: .
        command: celery -A enigma7_backend worker --loglevel=DEBUG
        volumes:
            - .:/code
        depends_on:
            - cloud_sql_proxy
            - redis

    celery-beat:
        build: .
        command: celery -A enigma7_backend beat -l DEBUG --scheduler django_celery_beat.schedulers:DatabaseScheduler
        volumes:
            - .:/code
        depends_on:
            - cloud_sql_proxy
            - redis
We define four services here: our Django server, a Celery worker, a Celery Beat worker and a Redis server for message queuing. We still need to connect to our database hosted on CloudSQL. You can refer to the official docs to set up your Postgres server on CloudSQL. It’s not a very great idea to expose your database on a public IP, as it makes it vulnerable to all kinds of mayhem. If the IP of our Postgres server is going to be private, we can connect to it using:
- A proxy server.
- Deploying all services in the same VPC.
GCP provides a tool, Cloud SQL proxy which lets us connect to our private CloudSQL instance from the outside world. You need to create a GCP service account in order to use the proxy, so go ahead and do that.
Once you have your .json file with the service account credentials, add the following service to your docker-compose.yml
    cloud_sql_proxy:
        image: gcr.io/cloudsql-docker/gce-proxy:1.16
        command: /cloud_sql_proxy -instances={instance_name}=tcp:0.0.0.0:5432
        volumes:
            - ./postgres-service-account.json:/config
        ports:
            - 5432:5432
Note: Make sure to change your database host to
cloud_sql_proxyin your Django settings.
Now for the final component of our setup: The Load Balancer. Before, we actually go configure that, we need to think about two things:
-
SSL/TLS: If we want our client to be able to talk to our backend, we need it to be HTTPS. That means we need to deal with configuring SSL certificates. Fortunately, since we are just concerned with deploying our backend services (i.e. the browser nevers loads them directly), we can get away with self-signed certs.
sudo mkdir /certs
sudo openssl req -x509 -nodes -days 365 -newkey rsa:2048 -keyout /certs/ssl-cert.key -out /certs/ssl-cert.crt
Note: If you’re using Cloudflare, they provide verified SSL certificates free of cost, so you can use that as well.
-
Rolling Deployments: It’s very much possible that we’d be required to push a hotfix during D-Day because of some unnoticed bug, but we want to do that without having to take down the service, i.e. zero downtime. We leverage two things to enable this:
- the
docker-compose scalecommand which lets us scale up or down a service according to our needs. - HAProxy has automatic service discovery.
We wrote a script to help us perform rolling deployments:
# !/bin/bash
for container_id in `docker ps --format "table {{.ID}}  {{.Names}}  {{.CreatedAt}}" | grep web | awk -F  "  " '{print $1}'`
do
    container_ids+=($container_id)
done
docker-compose up -d --build --no-deps --scale web=6 --no-recreate web
sleep 10
for container_id in "${container_ids[@]}"
do
    docker kill -s SIGTERM $container_id
done
sleep 1
for container_id in "${container_ids[@]}"
do
    docker rm -f $container_id
done
sleep 1
docker-compose up -d --no-deps --scale web=3 --no-recreate web
The script essenitally does the following things:
- Runs
docker psto get a list of all running containers and filters out the ones which contain “web” (since that’s the name of the service running our backend server.) - Forms a list containg the IDs of all such containers.
- Scales up the service to run 6 containers (note that we build the container explicitly to make sure that the new containers have the latest changes.)
- Kills and removes all the old containers (containers running the old code) using the list of IDs we had prepared.
- Scales the service down to 3 containers, so that we finally run three containers (all of them with the latest changes.)
Now, since HAProxy has automatic service discovery, it starts forwarding requests to the new containers on it’s own as and when they are spawned. This way we make sure that we never encounter any downtime while deploying changes in a quick and effective manner. We just need to make sure that we have the fix pulled into our local repo and then run
bash -c deploy.sh - the
Now, with both those things out of the way, let’s add the load balancer service.
    lb:
        image: dockercloud/haproxy
        links:
            - web
        ports:
            - 80:80
            - 443:443
        volumes:
            - /var/run/docker.sock:/var/run/docker.sock
            - /certs:/certs
        environment:
            EXTRA_BIND_SETTINGS: 443:no-sslv3
            CERT_FOLDER: /certs/
We provide a link to the web service, which lets the lb service know which service needs to be load balanced. We port map 443:433, since that’s the default HTTPS port. The volume mapping /certs/:/certs, makes sure that the load balancer has access to the required generated certificates to serve HTTPS server and perform TLS termination. It then passes a plain HTTP request to our actual backend server. The EXTRA_BIND_SETTINGS: 443:no-sslv3 env var takes care of preventing us against the POODLE SSLv3 Vulnerability, while CERT_FOLDER: /certs/ setting tells HAProxy the folder to look in for the SSL certificates.
Final Thoughts⌗
This entire setup turned out to be quite effective (possibly overkill, but eh xD). We had zero downtime (despite of several hotfixes being deployed), and fast response times. We had more than 2000 players from 69 countries (nice lol) and it was quite an exquisite feeling to see so many people using services designed and deployed by you and your team 🥰